A Piccolina Girl Kit
At the beginning of February I ordered a doll kit from Bamboletta.com. This January the good folks at Bamboletta started offering kits for their Piccolina dolls. These dolls are 9 inches tall. They sell this size doll at craft fairs and events but not in their on-line shop. The site states the kits are intended for the "crafty, not crafty person." January and February 2015 they offered the Piccolina Girl doll. With the Piccolina Girl kit I purchased, I had a choice of a couple skin colors, 3 hair colors, 3 eye colors, 2 lip colors and a choice of two different dresses. This month, March, they are offering a Mermaid! (A post on Instagram this weekend stated that they will have the regular Piccolina dolls available again on their website this week. They are currently all sold out).
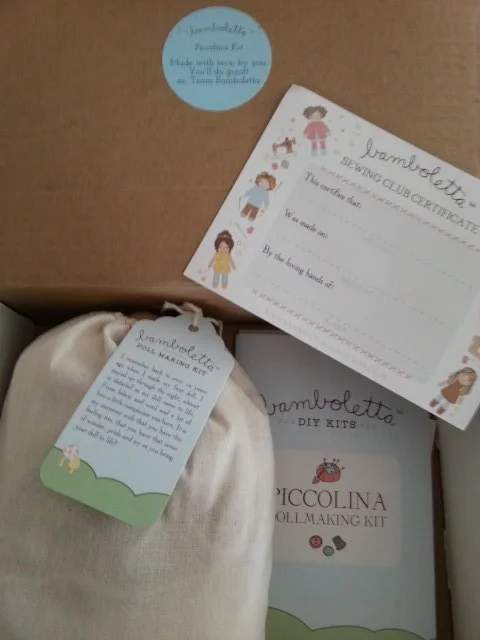
My Piccolina Girl kit arrived last week. What a beautiful kit! The kit itself is a work of art! (See above)! The kit includes a mostly completed doll body, the head ready but not yet attached to the body, yarn for hair, wool roving to stuff the torso and all the other supplies you need to finish the doll, including needles and thread.
The kit has wonderful, very detailed, instruction manual with lots of great drawn illustrations. On their website there are also 4 great videos for the kit. Everything you need to know to make your doll is brilliantly explained!
The afternoon my kit arrived, I sat down after supper to read through the instruction booklet. Right. That lasted 5 minutes! The instructions are so great that I felt totally comfortable doing the steps as I read them. Granted, this wasn't my first doll, but I not sure that made much of a difference. I was still a bit nervous about getting this doll right.
One of the suggestions for tools in the kit booklet is have a pair of plier and a thimble. I'd say absolutely to both! The wool in my doll's head was so tightly rolled (a good thing) that I really needed my needle nose pliers to get the needle to grab a bit of the wool in the head and back out to the torso when I was sewing the doll together. I would also recommend getting a back-up set of long doll needles. (I found Dritz doll needles at my Joann's Fabric). The 4 inch needle my the kit ended up so curved that I needed to switch it out for new, straight needle so I find the exit points I wanted when I embroidered the doll's face.
Here's my doll with her head attached to her torso. She is wearing the underpants supplied in the kit.
PIccolina Girl Kit, body assembled.
Arriving at the point of embroidering the face is one of the best places in this kit. The booklet explains EXACTLY how to place the eyes and mouth, as well as giving detailed, illustrated, instructions for the embroidery itself. But they also state that if you want to do your doll's face differently, to feel free to do so--they want this doll to be your doll. I really appreciated that comment in their instruction manual. I used the green embroidery thread in the kit for my doll's eyes but mixed it with a deep blue thread. The resulting 2 color mix is really subtle.
I had been planning to do a step-by-step photo essay of embroidering the doll's face. But I was having so much fun I totally forgot to take the pictures! (I think that was a good thing!)
Adding the hair is also fun too. There is lots of yarn included in the kit!! I added a about 12 strands of other colors of wool yarn. I chose the blonde hair offered in the kit for my doll. I added a bit of orange yarn, a couple strands of brown and a couple of red.
Here's Karen, my finished Piccolina Girl Kit Doll. Look at her outside in yard in front of the snowbank! She's got attitude! She wanted to stand, NOT sit!!, on the the doll chair! Isn't she cute?
If you want to make a doll yourself, absolutely buy a Piccolina Kit from Bamboletta.com! It's so much fun! When you are done, you'll have a lovely new friend. Her body is just the right size to hold in a hand. The Piccolina is the perfect size doll to go places with a child.
I can't wait to see what special doll kit Bamboletta.com creates for April!


