Color Study 2: Purple to Blue

by Judy Tucker


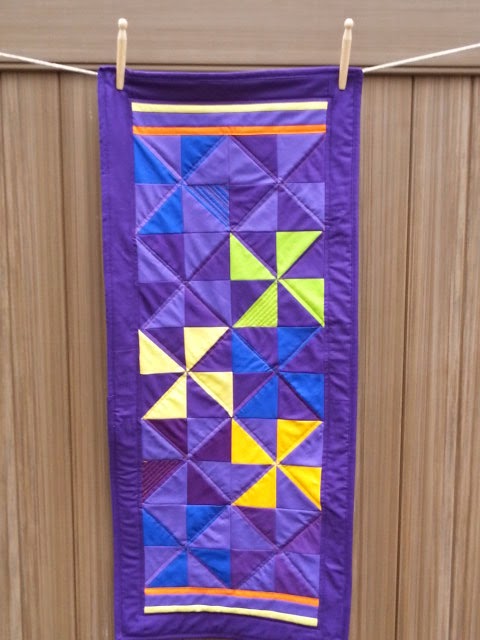
Color Study: Purple to Blue with Compliments.  A  table runner, 17.5 x 40.5 inches

This color study was a real challenge.  Purple isn't my favorite color and I really struggled even defining my purples.  I went to a local store with a large collection of Kona cottons and found what I thought was the perfect spectrum of blue to purples fabrics.  Until I got home and laid them out…

What is purple?  What is violet blue?   What is real blue?   The only one I was confident about was red-violet/magenta.

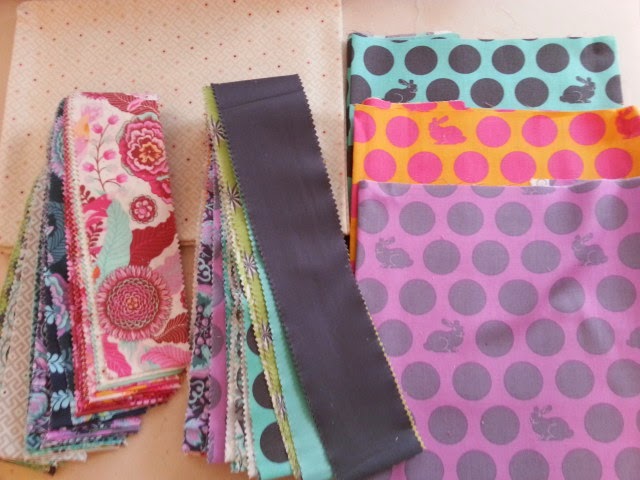
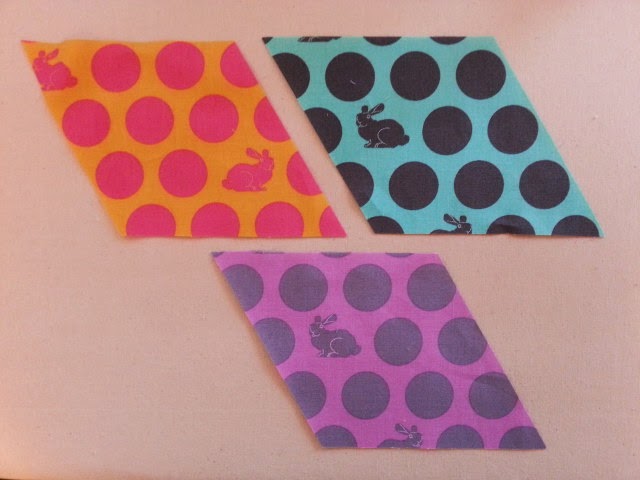
I'm not sure the color in the photo is all that clear either.  But here are my red-violet, purple, blue violet selections and blue selections.


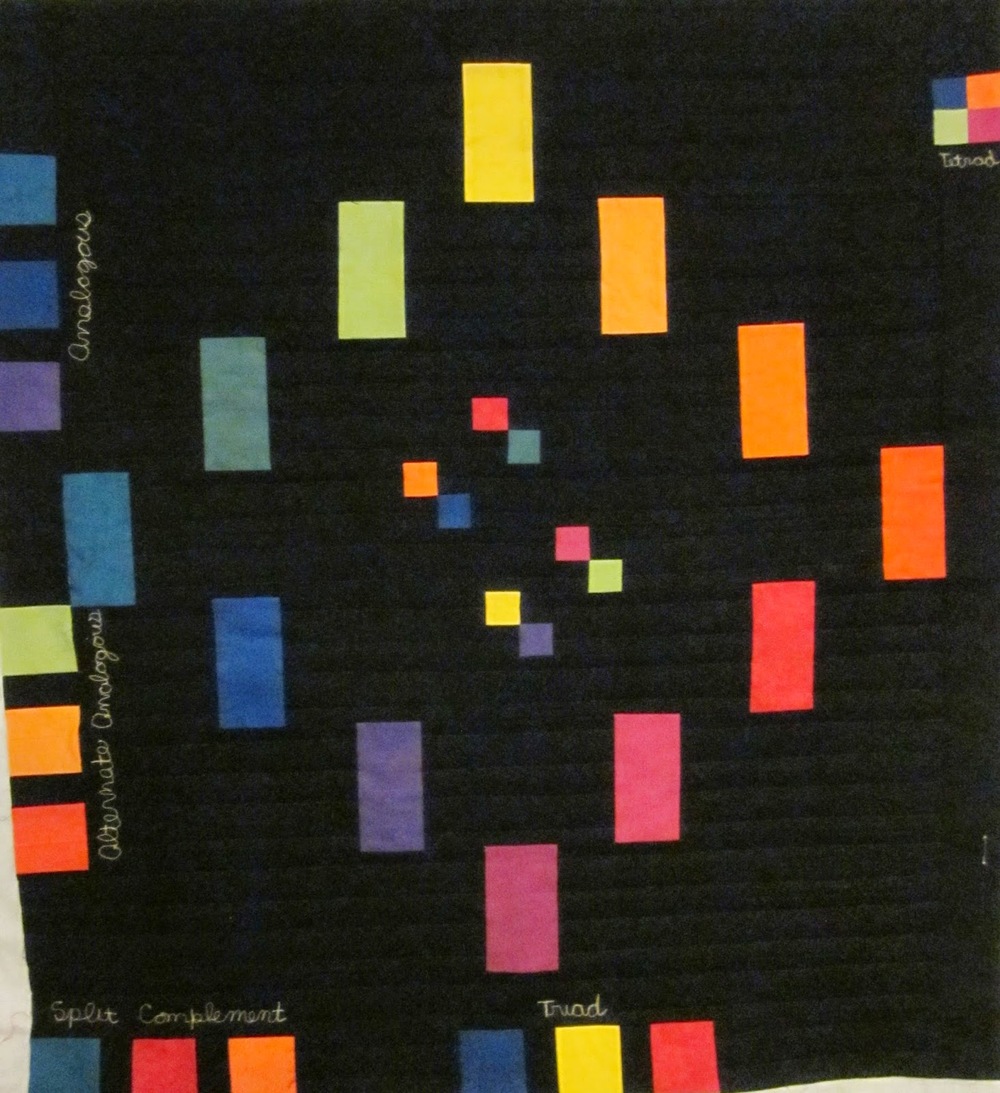
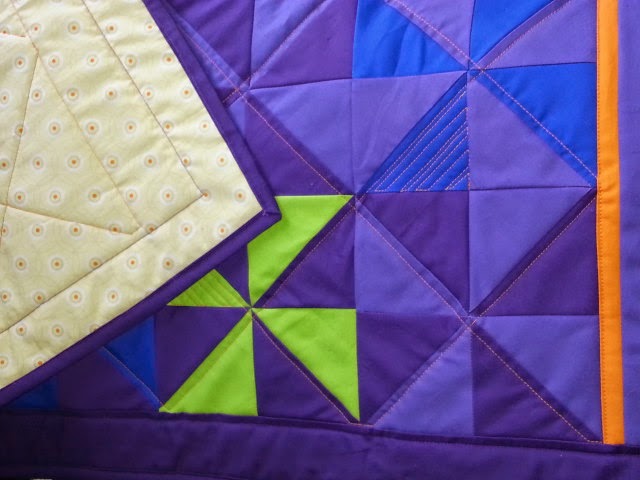
For this project I used 2 sets of analogous colors:
     Purple, blue-violet and blue
     Yellow-green, yellow and yellow-orange
Two of the colors are transitional colors.  (They are called transitional because they are made by mixing 2  primary colors).
     Purple--a combination of red and blue
     Green--a combination of yellow and blue

The yellow is the compliment of purple and yellow-orange the compliment of blue-violet.   I picked the green rather than orange for the block because I liked the effect better.
I then added some orange accents because that is the compliment of the blue.  I also chose orange thread for quilting.

Still unsure about what real purple is, I raided my stash and found 2 another purples so there are 3 purples in the project.  I think in the end, the purple in my border is the best purple of the three.

The first set of pinwheels I made combined blue and purple (middle block on the right above).  I didn't like them that much. They seemed harsh to me.  I'd jumped a step on the color wheel from purple to blue, bypassing the blue-violet.  So then I made several more blocks with blue-violet and blue, which I found more pleasing (top and bottom block on the left).  I put both pairings in the table runner for comparison.  This is a color study so I thought it would be good to include both pairings!

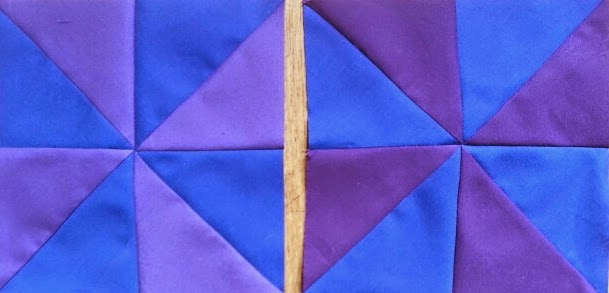
Blue with blue-violet (left),  Blue with purple (right)

I also found that the purple color seems to change depending on which other color I paired with it.  More than once I picked out a block which I thought had a purple I didn't want to use in the table runner, only to find that when I put the "wrong" purple right next to the "right" one they were the same!

I think one of my issues with purple (i.e., why I don't like it that much) is because it absorbs so much light.  Sewing the purple was like sewing black. I found it hard to see my stitches or where I was going.  I much prefer lights and brights!

Here's something else I noticed.  Standing up close to my computer monitor the colors in the wall hanging look washed out.  When I stepped back, the intensity and color was much truer to life.

I really like the completed table runner.  It's vivid!!

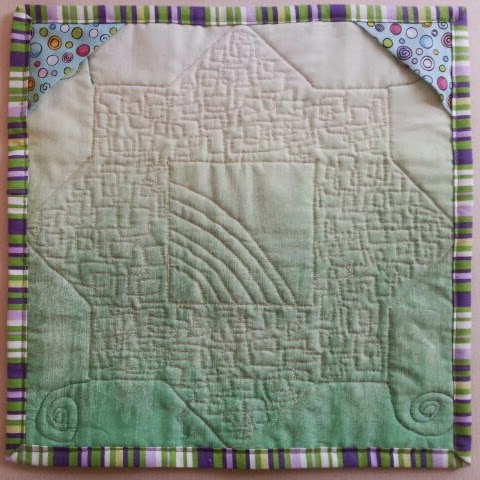
Here is the flip side:


This color study was a lot of fun and I learned a lot doing it.
I have an idea for a small project (just one block I think) using color gradations.  I'll keep you posted!


Book report: Minimal Quiltmaking by Gwen Marston

by Judy Tucker


When I ordered Gwen Marston's book  Minimal Quiltmaking pre-publication from Amazon.com in February I really didn't know what I was getting.  I really liked the "Winter Birch" quilt on the cover and knew this was going to a book about contemporary quilts.  I'm always interested in reading anything about Modern Quilting.  (FYI:  This book has the fiercest copyright statement I have seen.  No part of the book may be reproduced and there isn't a "look inside" feature at Amazon.com.  You'll need to click the links to get an idea about what is in the book).

Little did I know when I placed the order how apropos its arrival last week would be. This is a book about color and quilts!  Just what I have been thinking about a lot lately.

Gwen asked 22 quilters around the country to contribute quilts to the book and she includes dozens of her own quilts as well.  Some of the quilts were created by the women especially for the book.  Several of the quilters said in the comments about their quilt that when Gwen asked for a minimal quilt, they that to think about what that really meant.  But they had fun rising to the challenge.

The book is divided into chapters with different types of minimal quilts--they include "minimal quilts"(solids, mostly bright colors), "hard-edge quilts" (fabric cut with a ruler with sharp edges, no wonkiness), quilts with "minimal colors" (studies in pastels/neutrals), and "minimal quilts inspired by art."

I bought the book based on the image of the Winter Beech tree on the cover.  I think only 3 of the quilts in the book actually have a concrete image and even for one of those, you'd have to read the label to know what it is (a lily pad).

The rest of the quilts are really color studies: improvised designs with lots of pieced strips and blocks of color.

It was fun to see the quilts influenced by modern artists.  Here are just 3 of the artists who's work is reflected in the quilts.

I hadn't realized before that quilts that aim for "transparency" were inspired by tissue paper work done by Josef Albers.   It seems like a lot of quilters, and quilt collectors, have really been influenced by Albers.  Gerald Roy, a student of Albers, talked a lot about his work in the recent lecture I heard at the Museum of Fine Arts, Boston.

The author has made several quilts influenced by the work of  Piet Modrian.  (I'm just old enough to remember the dresses in the 1960s which were also based on his artwork)!

Paul Klee is another artist whose art influenced the quilters featured in this book. His art is a lot of fun and you can easily see why a quilter would drawn to his work.

Many of the quilts in the book were made using Kona cottons because of the wide color options available.  Cherrywood fabrics and some linen are also used.

I was able to find two of the quilts in the book made by Lynn Harris (TheLittleRedHen) on the Internet:
"Zinnias"
And a pattern for Daisy Chain.  This is one of the few quilts in the book which has an identifiable subject and isn't totally abstract.

Here are two blogs written by contributing quilters.
Over the fence designs, Pam J. Beal
Kristin Shields Folk Art  (scroll to the bottom of the page and click on Gwen Marston and Liberating Quilting

If you are interested in the Modern Quilting and the use of color and line, you'll appreciate having this book in your library.  And on your coffee table!


Color Study 1: Crosses and Losses variation completed

by Judy Tucker


I was able to quilt and bind my color study quilt, Crosses and Losses variation today.  I'm really pleased with the way it turned out.

I know that yesterday I wrote that I was thinking this quilt was going to be saved to give to a baby at some point,  but scratch that thought!  I really like it!  I'm going to keep it and put it in the rotation of small quilts which I keep on display in my front hall.  This quilt is such fun to look at!


Pilgrim/Roy Collection Inspired Modern Crosses and Losses Foxy Crib Quilt

by Judy Tucker


Having seen the Pilgrim/Roy Collection "Quilts in Color" exhibit at the Museum of Fine Arts, Boston, I decided it would be fun to do some color studies in quilts of my own. 

There is a quilt in the exhibit call Crosses and Losses.  It has blocks with bars (Losses, I guess) and alternating with 9 Patch blocks (Crosses).   Up close the quilt is nice, but from the far side of the room, it was really pops. The colors in that quilt are neutrals with yellow and orange accents.  It's an easy pattern so I decided to use it as a basis for my first color study. 

I exchanged the 9 Patch block for a Wonky Modern Cross block and varied the widths of the bars in the Losses block.  I chose 2 analogous colors (colors next to each other on the color wheel) and the complement to the cyan which is red-orange. 
Modern Variation of Crosses and Losses Quilt pattern with triangular accents and Mr Fox in his vest!

Yes, this quilt vibrates.  You should see it in real life!   I consider this a success.
I took about 8 photographs of this quilt top with my mobile phone and a camera.  In the photographs the margins between the cyan and red orange appear blurry while the blue and green seams appear sharp. I thought I had wiggled…but all the pictures show the same thing.  Fascinating.

Sly Mr. Fox, in his red-orange argyle vest, wanted in on the action.  He was hard to argue with since he met all the criteria for the color way except for his grey background.   Adding him makes this a fun baby quilt at 35 inches square.  The fox block actually calms the vibration in the quilt and gives your eyes a place to rest.  I made a third red orange triangle block but when I auditioned that block in place of the fox, looking at the quilt was almost painful.  (Put your finger over the fox block on your screen and you'll get the idea of what that quilt would have looked like). 

This was a great project.  I'm looking forward to quilting this top.  
I think I have an idea for a design for another color study quilt.  
To be continued.


Crafty's Tula Pink "Fox Tails" Mystery Quilt Update

by Judy Tucker


Today I finished assembling the Craftsy.com April Tula Pink Mystery Quilt.  It is a Log Cabin, Courthouse Steps variation, with the center block of the Log Cabin a large diamond.


Tula Pink's directions and accompanying photos for the quilt construction are excellent.
I was careful to always use the 60 degree mark when trimming the blocks and the points all match! I also credit Tula's precise instructions.  She explained exactly how to press the seams and how to use the  extending tips of the seams to get those perfect points. Amazing!

The quilt is set on the diagonal. The setting triangles at the top and bottom of the quilt in the kit are a cream print.  This is such a loud, busy quilt that it just seemed to me that the quilt pattern came to a full stop at those cream triangles.  I decided to continue the pattern to the quilt edges.

I used her directions to cut one triangle out of muslin.  I used that as a pattern to make pieced triangles from the left over fabric.  I turned out to be very straight forward.  The little triangle was exactly half the central diamond in the blocks and sewing on two 2.5 inch strips to each side made a setting triangle exactly the correct size.    The purple/grey dots, grey and aqua and aqua/grey dots is the setting triangle block.


The quilt is a good size for a double bed or a generous throw.  I have some fabric that is a good match and I could add a border to make it queen size.  I'm still thinking about it.

The color way of this quilt isn't my favorite, but I'm appreciating it a bit more now that I can see the whole quilt top.

I'm going to use the cream fabric from the kit as part of the backing and plan to use up some more of the scraps from the 2.5 inch strips. Should be interesting!

MFA Boston: Some pearls from the lecture "Color: A Primer" by Gerald Roy

by Judy Tucker


This is a fabric color wheel I created with Cherrywood Hand Dyed fabrics, 2013.
I attended a talk given by Gerald Roy on April 17, 2014.  He is the Roy of the Pilgrim/Roy Collection of quilts.  Some of their quilts are currently in the "Quilts and Color" exhibit at the Museum of Fine Arts, Boston now through July 27, 2014.   Roy spent part of the time discussing color theory and part discussing quilts and quilt construction.  I jotted down a few notes about some topics I found particularly interesting. I have an interest, but not expertise, in color theory so hopefully nothing in my notes has run amuck!

Isaac Newton created the first color wheel in 1705.  He placed the color in wedges in a circle.  If the wheel is spun, you only see white, not the individual colors.

When light is totally refracted the eye sees white.  If light is totally absorbed, the eye sees black.  Yellow is the most refractive of the colors. It is the only color which comes close to white in color refraction.  That's why Roy likes the yellow and white basket quilt in the Pilgrim/Roy collection.  He said that because the color refraction of white and yellow are so close you see the color in that quilt more than the pieced baskets.

Warm colors project forward while cool colors recede. He said that warm colors relate to the sun, cool colors to water.  Purple and green are created by mixing warm and cool colors and are only two "transitional" colors on the color wheel.  They interact well with both warm and cool colors.

Roy said that Abstract Expressionism was the first time in art history that color came first. Prior to that the subject of the painting was of primary importance and color was secondary. In traditional space the color is static. Dark and light colors are used to enhance the perspective to make the viewer think the space is 3 dimensional rather what a painting really is--something flat and with just 2 dimensions.   In abstract art there is plastic space.  Roy said that when there is no intentional image or shape, colors can move forward or backwards in the work.

Colors of equal intensity can create color vibration.  Contrast stops color interaction.
Only gradation of colors allow contrasting colors to move.  This is a great example of gradation from the "Quilts and Color" exhibit of the Pilgrim/Roy Collection.

Sunshine and Shadow, Mennonite, Pennsylvania, 1880s

Roy had a power point with his own paintings and quilts from the Pilgrim/Roy Collection to illustrate his talk.  I found his lecture fascinating.

Here are some interesting facts he shared about fabrics, quilts and color in fabrics.


  • Wool absorbs light so colors appear more intense.  Most of the classic Amish quilts are wool challis which is one of the reasons why their colors appear to be so rich.
  • Cotton reflects light.
  • Crazy quilts are made of silk.  Silk was sold by the pound, not by length of the fabric like cotton and wool.  Lead was added to the silk to make it heavier so they could charge more!  The lead causes deterioration of the fabric and makes the treated silk poisonous.  Yikes!  He went on to explain that crazy quilts were made for decoration, to put on a sofa or hung on a wall.  They were a way to show off the creator's embroidery skills and not intended for use on a bed.
  • The layers of a quilt are stitched together.  If ties are used, it's a comforter, not a quilt.  The ties are called "toppies" and the loose ends of the toppies can be on the top of the comforter or on the back side.  Either is fine.  
  • Hand quilters quilted inside the block to avoid the seam allowance where there were more layers of fabric to push the needle through.
  • Quilt care:  Fabric like to be flat and "comfortable".  Roy said that is you feel comfortable with the temperature and humidity in a room the quilt will be happy too and will last longer.


MFA, Boston--Quilts and Color: The Pilgrim/Roy Collection, Second Look

by Judy Tucker


Touching Sunbursts,  Pennsylvania 1854

Last night I had the privilege of hearing Gerald Roy, one of the 2 gentlemen who collected the quilts in at the Museum of Fine Arts, Boston, "Quilts and Color" show, speak about the collection and about color in quilts.

He told us a bit of the back story about the show.  They started talking about putting part of the Pilgrim/Roy quilt collection on exhibit at the MFA 5 years ago.  He credits the MFA's director, Malcolm Rogers, and the young museum staff with making this show possible. The museum has some quilts in their collection, mostly gifts from people, but he said no one at the museum in the past was particularly interested in them.

Roy said Malcolm Rogers came to his home to discuss the possibility of a quilt show at the MFA.  Before Roy would show Rogers any of his quilts, he had Rogers do some piecing and appliqué so he would better understand what he was looking at! Once Rogers had done some sewing, THEN Roy showed him some of his collection!

It took 100 people to get this show set up--Roy counted the carpenters as well as the curators!  He said everyone wore white gloves AND white coats and they all treated the quilts with utmost care.

The walls in each room were painted colors chosen to best show off the quilts being displayed. White walls are not a good choice for a quilt show.   It took 6 light engineers to get the lighting right.  The lights had to illuminate the quilts but there couldn't be any hot spots which could damage the quilts.  He commented that it is important to let your eyes adjust to the lighting in the galleries when you first enter. That's really true in my experience.

Some of the quilts are mounted on wooden frames which are padded with batting and muslin.  The quilts are sewn onto the frame, with stitches every 6 inches across the quilts to keep them flat and taut  without stretching them.  Roy commented that it is not great for the quilts but it does show them beautifully.  He added that the quilts are coming off the frames as soon as the show closes!

After the talk, my friend Janet and I went back to the exhibit to look at it again.  It was almost 9 PM and there were very few people in the gallery.  It was amazing to be there without a crowd.  If you can get there at night, do it!

I discovered I missed a whole room on my first visit. Yikes!  It was the section with all the appliqué quilts.  This room was labelled quilts with "Contrast."  Here is a Mariner's Compass made in Massachusetts in1840.  It's 20 years before the Civil War but the brown and cream fabric looks much like the Civil War  reproduction fabrics currently available.  I think this quilt would have also been happy in the room of quilts with Vibration, except those quilts vibrate due to color and this one vibrates because of the plaid.

Mariner's Compass

It was so quiet in the gallery last night that a one of the MFA guards came up and said "You have to come look at this quilt!" She led us to the yellow and white basket quilt made in New York in the 1920's-1930s in the "Mixtures" room.

Yes indeed!  We knew it well and also why she wanted us to see it.  This basket quilt is creating quite a buzz among the show's visitors.  If you stand right in front of the quilt, it does look yellow and white for a the most part.  But move to the right or left and you notice the white looks more like a light grey.
Did the quilt's maker run out of fabric and needed to substitute something different to complete the quilt?

Roy had just finished telling us about this quilt.  No, they believe the white is all the same fabric.
However, it is a cotton sateen (also known as cotton satin).   Ordinary plain woven cotton has a flat weave--the threads all run up and down or straight across.  In a sateen, the thread also has a diagonal weave. How the light strikes that diagonal weave determines how the fabric looks.

Notice how differently the fabric appears depending on where you are standing.  Fascinating!  We had fun expelling to the Museum guard why she was seeing the variation in the fabric's color.  That doesn't happen every day!

In his talk last evening, Roy, showed us a photo of the backing on this quilt.  It is light purple,  yellow's complement in the color wheel.  This delighted him no end!!   That is a detail you have to be told because you won't be able to see the backs of any of the quilts.

Basket Quilt, Front Facing 


From the left side


From the right side


One of the attendees at the lecture asked Roy what he thought about the Modern Quilt Movement.
He stopped to see if the audience knew what was being asked.  He asked who in the room were quilters.  It turned out almost everyone!   So he continued.  He thought the Modern Quilt Movement was great.  New people have started quilting which he said is always a good thing, the experimentation is great….and folks are buying lots of fabric!

One last comment from Gerald Roy:

He said a pieced top is only a pieced top.  "It isn't a quilt, until it is quilted."   
Those of you with a stack of UFOs….take note! 

I'll share some his thoughts on color in another post. 


Craftsy's Tula Pink Mystery Quilt

by Judy Tucker


Craftsy posted the workshop for Tula Pink's April Fox Field Mystery Quilt yesterday.

It turns that the only mystery was purchasing the kit for an unknown quilt project.  The whole set of instructions and a photo of the completed quilt were all posted at once. Hmmm.  Well, at least you don't get any surprises after you've cut the fabric!


Here are the fabrics in the kit.  (FYI: Craftsy sold over 1000 kits--completely sold out weeks ago, so there aren't any more available for this project).


It turns out the quilt is a Courthouse Steps Log Cabin…with a surprise. The center of the blocks is a diamond!


I haven't started sewing yet.  I'm still cutting pieces from the 3 stacks of 2.5 inch strips.

This quilt is a color and fabric design challenge for me.  I like the pink and orange combination and the aqua, grey and green combination.  Purple isn't a color I gravitate to often.  But put them all together??  Not a chance!

I've been looking at the color wheel and this set of colors just doesn't fit into any of the usual combinations.  They aren't compliments, triads or tetrads.  I've tried to make sense of them but just can't! That may be why I find the combination jarring.

But that's fine. I've challenged myself to step out of the box and try some new things in my quilting this year.  This qualifies!

Tula Pink has set the diamonds vertically in the quilt with large filler pyramids at the top and bottom.
She used a cream background which is in the top photo--barely visible under the strips.  It's a sharp contrast to the busy bright colors in the rest of the fabrics.  I'm not sure what I am going to do.  I might alter the pattern and cut off the diamond points.

I have some wonderful feathery aqua fabric which is a matching color which I could substitute for the pyramids or I could make another header and footer for the quilt. Here it is the feathery aqua fabric with a set of strips.


Can't wait to start sewing.  This is going to be interesting!
Please let me know if you can use the color wheel to explain the colors in this quilt!  Thanks!


MFA, Boston--Quilts and Color: The Pilgrim/Roy Collection, Part 2

by Judy Tucker


Here is Part 2 of my visit to the Museum of Fine Arts, Boston, quilt exhibit, "Quilts and Color: The Pilgrim/Roy Collection."

The next room in the exhibit had quilts with "Optical Illusions."

Here is an Economy Block quilt.  At the moment, it is a very popular quilt design in the quilting blog community and the current Modern Quilt movement. 
This quilt is from Pennsylvania, made in the 1870s.

Economy Patch


This amazing Orange Peel quilt was made in Pennsylvania in the 1880s or 1890s.

Orange Peel

Notice the secondary pattern in this quilt.  It's a Grandmother's garden with hexagons but the small black hexagons outlining large diamonds in the pattern give the quilt the look of baby's block.  Very cool.

Field of Diamonds


This is a 4 block star variation, made in Pennsylvania between 1880 and 1900.  I especially like the zig-zag border on this quilt.

Four Block Star Variation

The last room in the exhibit was "Singular Visions."  These were quilts which didn't really fit in any of the other categories. 

This Seven Sister's quilt is from Pennsylvania in the 1880s.
Seven Sisters


This was a wool tied quilt from Missouri from 1910.  It's delightful.  It is another of my favorites. 

Center Medallion Tied Childs quilt

This is Tumbler's Block.  It's quite wonky!  If you didn't know that it was made in Pennsylvania around 1920, you might think this quilt was new.  It looks like one of the current Modern Quilt Movement quilts.

Tumbler's Block

And finally,
Cross and Losses, made in Maine in the 1900s.  I really like the bold statement made by the simple nine patch blocks alternated with the bar blocks. It's a quilt I didn't really appreciate until I backed up and looked at it from a distance. 

Crosses and Losses


This is a great show.  If you are in the Boston, Massachusetts area any time before July 27, 2014, I highly recommend that you plan to visit the Museum of Fine Arts to see this exhibit.  There are so many more amazing quilts that what I shown in these two posts.  

"Quilts and Color"  is definitely worth the price of admission.   However,  if the cost of museum admission is a hurdle for you,  the MFA is waiving admission fees for a Community Day, Saturday, April 19, 2014 from 10 AM until 4:45 PM.  So you could see the show for free that day. You may also be able to pick up a pass for admission at discounted rate from your local public library.

The Artist Demonstration I attended on Sunday is going to be offered again tomorrow, Wednesday April 16th, 2014. 

I hope you get a chance to come to Boston to see all these quilts!


MFA, Boston: Quilts and Color: The Pilgrim/Roy Collection, Part 1

by Judy Tucker


If I had to sum up the new quilt exhibit Quilts and Color at Boston's Museum of Fine Arts in two words I'd say the quilts themselves are fantastic and the colors vibrant.  These two quilt collectors, Gerald Roy and Paul Pilgrim, are both artists.  They definitely have an eye for design and color. There isn't a ho-hum quilt in the collection.

The elevators to the exhibit are are sporting a quilt design

Each room of the exhibit was paired with a painting which helped explain the use of colors and design in the quilts in that room.  There was also a handout with the exhibit which had color wheels that showed how the colors in the quilts related to each other to create various effects.

Here are some of the quilts which I particularly liked.

       This is a Pennsylvania Mennonite quilt made in the 1880s.  It was in the collection of quilts that are in the "Vibration" room.

Ocean Waves


I really like the daisy quilting in this Double Irish Chain, a Mennonite quilt dated 1880-1890.

Double Irish Chain

This was one of the "quietest" quilts in the exhibit.  It was in the "Mixtures" room.

Flying Geese

From the "Harmonies" room.

 An Amish Quilt from the 1930s. I particularly like this quilt.

Thousand Pyramids


In the "Gradations" Room:

This quilt was made in Pennsylvania in the 1880s. The quilt's design is based on the story of Joseph in the Old Testament of the Bible. He was given a coat of many colors by his father which made his brothers very jealous.

Joseph's Coat

This quilt was also made in Pennsylvania in the 1880s.

Sunshine and Shadow


The next room was "Variations."

From Pennsylvania, 1983, this is a log cabin quilt.
Log cabin, Barn Raising Variation
And another Log Cabin quilt from Pennsylvania in the 1870s.

Detail from Log Cabin quilt, Straight Furrow variation

Isn't this amazing?  And these are only a few of the quilts on exhibit.  There are still several more rooms to visit. I'll share some more of my other favorite quilts in my next post.


MFA Boston--Spring into Color: The Artist Demonstration by Anne Gallo and Susan Raban

by Judy Tucker


Four of us went to the Museum of Fine Arts, Boston, today to see the "Quilts and Color: The Pilgrim/Roy Collection" exhibit and the special Artist Demonstration being given just this Sunday.

The "To Boston with Love" flags which were made by quilters from around the world to "honor and support Boston" after the Boston Marathon Bombings 12 months ago, are back on exhibit.  They look great.  With the first anniversary of the bombings coming up in a week,  I'm sure Bostonians still appreciate the support.   I know I do!


The Artist Demonstration given today was on Quilt Making. It was given by Anne Gallo and Susan Raban, 2 women who quilt and teach quilting.  We sat in on a session.  They gave the group a talk about basic quilting.  They had some good show-and-tell to illustrate their talk.

They had brought along 2 quilts and one WIP of the same star pattern but in different color ways.  I was tickled when one of the women said she had put the pieces of a block together and then discovered she had placed them incorrectly according to the pattern she was working from.  When she sat back and looked at this variant block, she saw that her "mistake" made a fabulous block, better than the one she meant to make! That "mistake" created a great quilt!! (See below).  I love quilting and quilters!!

This is the black and white color way of that quilt.  They had one in blues and another in cranberry and tans.


This demonstration also had a great hands-on component. They had set up a table with stacks of batiks cut in squares and pre-sewn triangle patches.  Everyone was invited to sit down and create a block with a pattern of their choice.  There was an example of a star block you could copy hanging on a little design wall but the 2 helpers also encouraged folks do whatever they wanted to with the pieces on the table.

My star block right front

Our friend, Patty, who isn't a quilter, had a great time placing the pieces in different configurations.
There was a glue stick on the table so you could glue the pieces in place on a piece of backing fabric to take them home to sew the block together. Here is Patty working on her block and her finished design.


This was a lot of fun and got us in the mood for viewing the exhibit…
I'll take you on my version of the tour in my next post.


Economy Block Lattice Variation Baby Quilt Completed!

by Judy Tucker


The baby quilt with my Lattice Variation of the Economy Block is done!

The new baby's big sister was visiting me this week.  She chose the layout for the completed blocks, picked the border fabric and the backing.  She also put her stamp of approval on my choice for the binding.

Backing

She picked a quiet light grey and white calico for the backing.  The family has ties to Hawaii so I had thought about using a Hawaiian fabric on the back of the quilt.  The baby's big sister said the Hawaiian fabric was nice but "a bit too much!"   She definitely made a great choice.   A big thanks to K. for all her help!!      

Vetoed!

I asked her to sign the label for the quilt…she really liked that!  It was well deserved--she played a big part in the final design of the quilt.  Here is the label before it was signed:

Two of the individual blocks:

One of the motifs in the fabric is of a cat being carried away by 3 balloons.  When I first put the blocks together, the balloons were in the left upper corner of the block with the cat.  But the physics just didn't work with them there.  The balloon strings would have needed to take a 90 degree turn to connect to the cat.  So I took the balloons out of that block and moved them to the lower left corner of the block above.  Now the cat can float away!


New exhibit, Museum of Fine Arts, Boston

by Judy Tucker


The MFA in Boston opened a new exhibit,  Quilts and Color, yesterday.  I haven't seen it yet but I have heard from a couple friends who have see the exhibit, that it is a great show.

Amy Friend, During Quiet Time.com, put out a post on her blog the other day saying that the MFA is putting together a Facebook album of quilters and their quilts to go along with the show.   I went out with my friends Ginny K. and Janet H. this weekend and we each took a photo to add to the MFA FB  album.

Here's one of my mine.  It's not the picture I submitted to the MFA. I wanted theirs to be different than this one.

They are still accepting photos until April 10th.  Head out and take a picture of you and one or more quilts!  If you click Amy's link above, you will get all the details about submitting the photo.


Can't wait to see your photos on Facebook!
I am also really looking forward to going to see the exhibit at the MFA.

Update on the Charity Quilt for the Somerville Homeless Coalition

by Judy Tucker


Wow!  The PBQ (Proper Bostonian Quilter's) Guild really has come through with the blocks for the Wonky Star Raffle Quilt we are making for the Somerville Homeless Coalition!   Two weeks after we handed out the fabric, guild members turned in 21 completed blocks.  Way to go ladies!!

We had made a few sample blocks so here are all the blocks we have so far!  We just need 4 more and they are already in the works.


We are planning to add a 2.5 inch strip of white fabric around the outer sides of the assembled blocks so they "float."

There will be two outer borders. The first border will be a narrow strip of solid turquoise Kona cotton and next to that a wider border of a crisp looking lattice print fabric with little turquoise accents. The binding will be a deep royal blue binding.


This quilt is really coming along beautifully.  A big thanks to everyone who has been contributed their time and scraps to make a block or two for this project!

Improv Block: Friendly Fox

by Judy Tucker


This is a week of chores and Spring Cleaning, so I haven't had much time for quilting.   But I did take off and hour and a half to try my hand at an improv block, something that I haven't done before.

I had some great fox fabric from Robert Kaufman and then the other day I found some cute chicken fabric from Camelot Cottons. I had a stack of Moda's "boho" 2.5 inch blocks which I added to the mix.


I had the lyrics of Peter, Paul and Mary's song "The Fox" circling in my mind while I was thinking about what to do with these great fabrics.

I've been looking at Yoshiko  Jinzenji's Quilting Line and Color: Techniques and Designs for Abstract Quilts.  It is a really interesting book. The quilts in the book are quite abstract and for the most part, not something I would make.  But I do like the linear pattern of the quilt on the book's cover.   So that was part of the inspiration for this block.


The lyrics of Peter, Paul and Mary's song start "Oh, The fox went out on a chilly night…"
And two lines near the end of the song:   "…they never had such a supper in their life…And the little ones chewed on the bones-o."

I'm afraid I've bowdlerized the song it a bit in my block!  The fox in his vest looks like a friendly sort and the chicks are safe in a hen house!  I doubt there will be any finger lickin' here!


I really like the skinny linear strip just off center in the block with the 2 rectangular elements balancing each other in the corners.  

I made the skinny patterned strip by sewing 4 of the 2.5 inch blocks together. Then I cut that strip of blocks in half vertically. I added another half a block from that fabric line to the end of the adjacent grey strip.  The other 2 small squares came from my stash.

The finished block is about 12.75 inches square.

Not sure what I'm going to do with it.   But I sure had a lot of fun making it!

Economy Block Lattice Variation: On the design wall

by Judy Tucker


Today I got the blocks made for my Lattice Variation of the Economy Block.
It only took me about 4 hours of sewing to assemble the 9 blocks for a baby quilt.

Here are the blocks are on the design wall.


This quilt for a baby girl.  Her big brother and sister are coming for a visit next week.
I'm going to let them decide how to set the blocks and will let them pick the fabrics to use for the border(s).

We have a lot of options!


And look at this great print "Maman" designed by Anne-Marie Bossert for the Petites Filles line by Cloud 9 Fabrics.   I'm going to fussy cut the children leaning over the bassinet for the quilt label.  


Can't wait to see how the finished top comes out!

"I want to learn to quilt someday": Review of a Craftsy course for novice quilters

by Judy Tucker


It was pouring buckets this morning.  I'd donned foul weather gear and taken the dogs out in the rain for their morning walk.  I had a hot cup of coffee, now what to do?

I headed over to Craftsy.com on my computer to see what I could find.   And I found a gem: Piece, Patch, Quilt: Basic Quiltmaking Skills.  This course is taught by Gail Kessler, a quilt shop owner and quilter, and it has 3 hours of video showing all the basic quilting skills you need to make an easy quilt.    And….the course is FREE!

This classes start with picking a pattern.  (The course materials include 3 free patterns. Two of the patterns are for large quilts and one is for a mug rug, about the size of a placemat).  Gail offers insight on how to pick colors, types of fabrics to use and how to best use designs on the fabrics.  She teaches the student how to do rotary cutting and chain piecing.  She goes on with how to assemble the blocks, how to add sashing, borders, bindings and finishes up with making a label.  Everything a novice quilter needs to get going on a first quilt is included the class.  Like all Craftsy classes, you can add notes to yourself  in each video and you can go back as often as needed to review a technique.   In most Craftsy classes, you can ask the instructor a question.  But because this course is free, that option is not available.   Gail does such a great job teaching and demonstrating the quilting process, the typical student should be able to do the lessons without added input.

I watched all 11 lessons today.  I've been quilting for a long time.  My mom had a bachelor's degree in Interior Design so I've been around fabric my entire life.  I thought I knew a lot.  But I learned a number of new things.  Here is a list of some of the great tips I picked up:

1.  Thread is wound by the manufacturer 2 different ways.
        Cross wound tread looks like it has a zig-zag pattern on the spool.  It is supposed to come off the top of the spool so works best if used on the horizontal spool holder on the sewing machine.


        Stacked thread is wound around the spoon in an even circle.  Thread is supposed to come off the spool from the side, to it works best when used on the vertical spool holder on the sewing machine.


2. The colored dots on the selvage of fabrics are called "gams." I think these are so cool.  Each gam indicates a different colored screen needed in the process of printing the fabric's pattern.   Here are the gams for "This and That" by Nancy Halvorson for Benartex LLC.   Gail commented that selvages cut off fabrics used in a quilt could be saved as 'library' for future reference or….used as tomato ties in the garden!  Yikes!   That will cause palpitations in the hearts of lots of folks who use selvages as design elements in their quilts and other sewing projects!
   

3. Pre-washing isn't necessary. Gail recommended that if you wanted to do it, you should just use plain water in the rinse cycle of the washing machine and NOT use any soap.  Put the material in the drier until the fabric is 80% dry, then take it out and iron it.

4.  The walking foot on the sewing machine effectively adds feed dogs on the top surface of what you are sewing.  Along with the feed dogs under the plate on the sewing machine, they work in tandem to help pull the quilt throughout the machine. I love my walking foot.  I use it for quilting and for sewing on bindings.  I knew it makes those projects much easier…I just never knew why!

5.  Sewing machine needles with higher numbers are larger.  HAND sewing needles with higher number are smaller.  Go figure!

6. While threading a needle for hand work,  put the newly cut end of the thread through the needle and pull it all the way out to the end and knot that.  Gail states that the twist on the thread will run through the fabric more easily and you'll get fewer thread tangles!   She also recommends that you not use a tread any longer than the distance from your hand to your elbow. This limits the wear on the thread as it goes through the fabric and the thread should last better and remain stronger over time.

If you want to start quilting, or if you have a friend who wants to learn to quilt, or if you have a rainy Spring day and want to watch some great free videos, head on over to Craftsy and sign up for "Piece, Patch,  Quilt!"  I highly recommend this class!

Vintage Quilt Revival Top is Completed

by Judy Tucker


I finished my Vintage Quilt Revival top today.  The book Vintage Quilt Revival has examples of 3 ways to set the blocks.  I opted for the version with the sashing.   The quilt with the sashing in the book didn't have any borders.  The authors said they felt that was more in keeping with a Modern quilt.  Their quilt with the sashing is on the cover of the book.


Without the borders, the quilt just covered the top of a queen sized bed.  I decided I wanted at least a bit of overhang.  I added 2 extra borders on each side but not at the top or bottom of the quilt.  I think the borders look like a continuation of the sashing, except that the borders don't have the lighter blue blocks at the intersections.

Here is the quilt from the side.  I tried to photograph it outdoors today without success. A weekend rain storm was moving in. Every time I got the quilt set for the picture a gust would catch it.  It was more sail than quilt!  I finally gave up and took it indoors.  Not an ideal location for the photo…but done!


I plan to bind the quilt with the Kona Cadet Blue which is framing the blocks and is the outermost border.  So the binding won't add an extra element to the quilt.

My sewing machine is due for its annual Spring cleaning and tune-up.  I'm going to get that done before I start the quilting on this project.

Castle Walls Block

by Judy Tucker


I was chatting about project ideas with a quilting friend the other day.  She told me that she wants to make a princess quilt but with an interesting twist. It's going to be very cute…but it's her project so I don't want to spill the beans about her idea.

That evening I was looking through the Fat Quarterly book, Shape Workshop for Quilters by Katy Jones, Brioni Greenberg, Tacha Bruecher and John Q. Adams.  With princesses still in my mind, I was very taken by John's block, "Castle Walls."

His block has an open square at the center.   Those open spaces in blocks always call to my imagination.

Now I'm NOT a pink and purple princess person.  In fact, that sort of princess makes me cringe.
I'm more of a 3 siblings (now they don't HAVE to be brothers do they??) set off to find their fortunes type. But I really liked the block.

It was only a short sideways step from Castle to Ivory Tower.  Now that was something I could work with!

The title came first:  "Burning the Midnight Oil in the Ivory Tower."   A scholar, rather than a princess, was going to go in the center of my block…or at least evidence of a scholar!

I started with a bookshelf.
I pulled out a number of strings from my string collection.  They were 3/4 inches to 1.5" wide.
From a 2.5 inch wide piece of Kona cotton "Snow" I cut cream rectangles the width of each of the string strips and sewed them together.


Then I sewed the strips together, staggering the height of the colored portion of the strip to look like books of different heights.


Then I trimmed the "books" to the size needed for the square needed in the center of the quilt block.


I sewed a 1.5 inch brown strip across the bottom of the strip set 3/4 inch from the lower edge of the strips.  Then I flipped the brown fabric down and trimmed it.  That created the book shelf. (See below).

I used 2 different cream colored Kona fabrics for the tower (castle) walls.   The green corners came out of my stash of 2.5 inch squares left over from other projects.  I choose green to make it look like shrubbery around the Ivory Tower!

Then I quilted radiating arcs with yellow thread to indicate the rays from a candle on the scholar's desk which is out of sight below the level of the bookcase.

And I used a boxy quilting pattern to emulate the stone walls of the ivory tower.


Last Sunday at J.P. Knit and Stitch I saw the small Boston Modern Quilt Guild Challenge Quilt wall hanging made by Alice Webb Greer.  She blogs at Alidiza.com.  She is one of the quilters featured in Rachel May's book, Quilting with a Modern Slant.   Alice sewed folded squares into the upper corners under the binding on the back of her wall hanging. A dowel can be tucked under each of the triangles to hang up the piece.  Very clever.  Lots easier and tidier than using a sleeve.

Here are the corners on my wall hanging:


A fun little project.  The Castle Walls Block and not a Pink Princess in sight!

Book Report: Quilts on the Double

by Judy Tucker


I was so happy today when I checked Amazon to see if one of my favorite quilt books is still available…and it is!

Here's my copy--complete with sticky notes from 4 years ago!

Quilts on the Double was written by two Australian quilters, Judy Hooworth and Margaret Rolfe.
This is a book of easy strip pieced designs but there are 2 amazing things about this book:

1. With careful cutting and the addition of a bit of extra fabric you can get three quilts from one set of strips!
2.  There are 50 different ways to construct the blocks, all of which are illustrated the the book!

The patterns are divided in to Tops, Tails and Sides.
Here are the first 2 quilts I made using the book.  (I didn't use the Sides for a third quilt).


Tops Quilt

Tail's Quilt
Clearly, these weren't quilts with Modern aesthetics!

Here is a Tails Quilt that I made from a different strip set.  Quite a bit brighter!


I did make a set of pinwheels from the Sides from this set of strips but I don't have photos of them or the Tops quilt from these fabrics.

I have been thinking at lot recently about going back to use this book again, this time to make several Modern quilts with solid fabrics (and maybe some Modern prints).

Fabric requirements:
    6 coordinating Fat Quarters
    6 contrasting Fat Quarters
    2 yards of an accent fabric that compliments both sets of Fat Quarters

I don't have a lot of solids in my stash anymore so I set off on an Internet search to see what I could find.  Because these fabrics will make 3 quilts, I needed to find solid colors that I really like.

I looked at the stack of Kona Sunrise FQs.  I do like them but I already have that collection in 2 sets of charm squares so it didn't make much sense to repeat that.

Then I found the set of "Summer Basics" in Moda Bella Solids from the Etsy Fabricshoppe.  There are only 8 FQ in this collection.  But I really like the 4 warms and 4 cool colors in this collection and I think I have some fabrics in my stash to add 2 more warm FQs and 2 more cool FQs.   I might have an accent fabric but will have to wait for the fabric to arrive before I can decide that.

I'm excited to use Quilts on the Double but from a Modern perspective.   I think it will be a great Spring/Summer project!  I can't wait for my fabric to arrive so I can get started!